Thursday, 13 April 2017

Celebrating Easter


   The Easter holiday is fast approaching; it is literally this weekend!!  I cannot believe how fast April is flying by, but never the less, it is here, and I love celebrating Easter. It is a time when we get together with family and enjoy good food, laughter and beautiful weather (hopefully)!
   Today I am going to share an easy and casual Easter table scape, as well as a fun Easter egg hunt for the littles in your life. Whether you are having friends or family over for a simple late afternoon lunch, or maybe even an early morning brunch, these ideas will bring some spring fun to your Easter holiday!
   So you are having a little get together to share in the Easter celebration, and you want to impress them without breaking the bank! No worries; this simple yet stunning table setting will do the trick!
   White chargers, cream dinner plates and floral napkins in soft blues and greens, bring on the feeling of spring! Add a few pretty pastel blue egg shaped bowls, alongside green salad plates to complement the colours, and your table is nearly complete!
   I love these pastel coloured chalkboard eggs; yes that's right! Chalkboard!! I found them www.walmart.ca for $1.98. You get 12 eggs in various colours, plus a box of chalk! Adorable!
   Here I used them to act as place cards for your table and added gold initial stickers. If your handwriting is exceptional, then you could always add the letter with the provided chalk.
   I then used my favourite brass napkin rings as a holder for the eggs, and placed them on a small white side plate, which would be used as a bread plate. I wanted to use egg cups to hold the chalkboard egg, but had a hard time finding any. If you happen to have a set, by all means pull them out, as they would work beautifully on any Easter table.
   Then all you need to round out your table is glassware and cutlery, and a few more touches of colour. Here I used simple stemmed wine glasses and water glasses with a green hue to them, and added some lovely silver cutlery.
   I also like to sometimes dress up the place setting with a little something. I found some small twig wreaths at www.michaels.ca, and added them to the salad plate for a little visual interest. Of course, they will be removed once the meal is served, but for now, it gives your guests a taste of how much attention to detail you put in for them!
   A simple and easy centrepiece which doesn't take any time to do, is some lovely tulips and greenery. Here I used a metal pitcher and placed it on top of some grass mats which I found at the dollar store! It just adds an extra spring touch that doesn't cost a lot. I also added a pretty Easter platter just because, and a ceramic bunny. You could always make the platter useful by adding a butter dish or jam jars ( if you are serving brunch).
   And there you have a casual Easter table ready for friends or family!
 
   Now if your guests are bringing children, why not let them have a pretty table set up all for themselves! If they are old enough to sit on their own, it would be so fun for them to have a place where they can sit with their friends and just be kids. If the weather permits, you could set this up outside, but indoors works just as well.
   It also helps if the outdoor area isn't too far from the dining area, this way parents can keep an eye on the younger children if need be. You just have to work with the ages of the children and what feels right to you!
   I remember always having our own table as children, especially for holiday get togethers. It was always so much fun! We felt like we were grown ups, even though our parents were in the next room, or even in the same room sometimes!
   Make it colourful and make it fun!

   If the children are fussy eaters, meaning they won't eat the adult food, and it's okay with the parents, give them a fun meal. Children love to snack, so why not give them little lunch boxes filled with plastic easter egg snacks! Fill the eggs with crackers, cheese, carrots and hummus/dip, bite sized fruit like blueberries or cut up strawberries, cheerios, etc. Bite size is the key!
   If they are going to eat what the adults are eating, then you could always just give them pretty paper plates to have their meal on, or if you are able to cut up some of the meal items into bite size portions, then those items could be placed inside of the eggs. In a pinch, muffin liners work really well too!
   Assign each child their own special seat with these adorable chalkboard signs in Easter motifs! At the end of the day, they can take them home with them too as a little reminder!
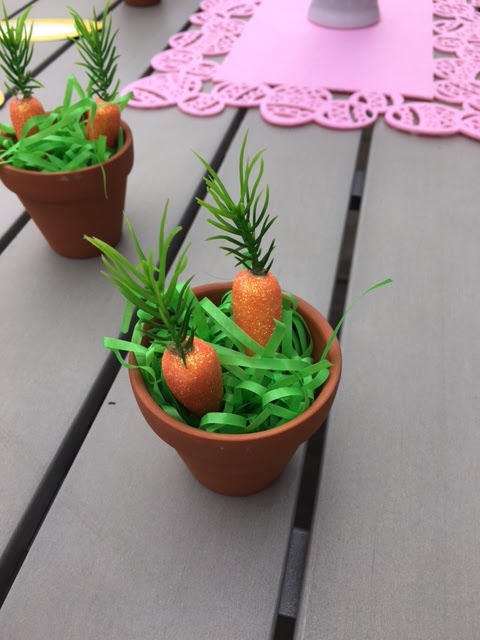
   Don't forget to dress up their table too! Ceramic bunnies, tulips in a milk glass vase and little carrot pots are so cute, and these little carrot pots are a cinch to make!

   1. I used 6 mini terracotta pots and cleaned them out.

   2. Stuffed them with basket grass (the kind you use for Easter baskets).

   3. Added these adorable sparkly carrots to make it look like they were growing out of the pot!

   And ta-da! I told you it was easy!
   Once the meal is over for both children and adults, how about getting into the spirit with an Easter egg hunt. Have baskets or pails at the ready for each child, and a good idea is to have it all set up before hand so you don't have to scramble for places to hide the eggs! If you are limited on space, maybe keep the children distracted with games while one or two of the adults do the hiding!
   Some game ideas are:
                -tic tac toe
                -pin the tail on the bunny (printable found at www.sugarandcharm.com
                -Don't Eat The Peep (printable found at www.thirtyhandmadedays.com

               
                -disc or bean bag toss
                -plastic egg tower: this is where you get a bunch of plastic easter egg halves and see how many you can stack on top of one another without falling down. This is a great game for the younger kiddos.
    Now the egg hunt can begin! A few rules to keep everyone happy while egg hunting, are to try and keep the location of the eggs in one general location, such as the backyard only, and have a variety of eggs to find. Chocolate ones, plastic ones filled with jelly beans or even non-sugar treats.
   You could even fill the plastic eggs with instructions for simple exercises that are great fun for all ages.
          Here are some ideas:
                 
                     -touch your toes 4 times
                     -do 10 jumping jacks
                     -hop like a bunny/ cluck like a chicken
                     -march on the spot for 20 seconds
                     -dance around like a butterfly
                     -hop on one foot and touch your nose
This list could go on and on, but I am sure you get the point!

   If you have more than four children at your egg hunt, an easy trick for everyone enjoying themselves and making sure they all go home with candy or treats, is to give each child a pail in a different colour. Hide eggs in coordinating colours, and instruct the children to only find the eggs or candy that match their pail colour! No one goes home crying or complaining that Johnny has more than they have, and everyone, including the adults, have a good time!  


      I hope that you find this post interesting and filled with ideas that you can use to create a fun-filled, and entertaining Easter celebration for your family and friends!
   Happy Easter to you and yours! Until next time!
 

~A


Friday, 7 April 2017

Springtime Tea Party


   Hello everyone and welcome! I feel it, the sun is shining, it's getting a tiny bit warmer, and Spring is in the air! At least I hope it is! Spring brings a sense of renewal, and a feeling of happiness. After all, the days become brighter, warmer and longer, and spring colours pop from every garden and flower bed.
   This is also the season of Easter, Mother's Day, maybe a few weddings, and with that, bridal and baby showers. So today's post is all about throwing a sweet springtime tea party. A tea themed bridal or baby shower would be a lovely way to celebrate the guest of honour. But even better, why not invite a few of your closest friends over instead, for an intimate get together.
   Today I will show you ways to set a pretty table, a take home gift idea, a few recipes and lots of great ideas and tips for throwing your own tea party.
   Afternoon Tea has been a time-honoured tradition for years, and still to this day, you can find tea rooms, and hotels that host High Tea, all around the city. Afternoon tea was specifically for the upper class back in the day. It was more of a mini meal, served from 4 to 6 pm, and was a way to tie them over until dinner, which usually was later in the evening. Some would have their meals after 8pm!
   High Tea was reserved for the middle class. The idea was pretty much the same, but it was believed they sat at higher tables and chairs, hence the name, High Tea. Nowadays, it is simply referred as High Tea everywhere.
   Having a tea party is where you get to pull out all the stops. Your finest china, heirloom tea cups, prettiest linens and silverware. Your tea party table can be set up anywhere, and if weather permits, it would be lovely to have it outdoors in a backyard or on a porch.
   Keep your tea party small, I would say 6 to 8 guests; 10 at the most. You lose that intimacy if you invite too many guests, and a tea buffet is not the same thing as high tea! Just saying! You can send out pretty handwritten invitations or nowadays, an e-vite is more than acceptable.
   My rules are always the same; send out your invites at least two weeks before your party, to give guests ample time to make plans, as well as, give you a chance to think of the menu and decor.
   A typical High Tea menu consists of finger sandwiches and a few sweet desserts, as well as of course, tea. Coffee is also a good choice to serve just in case you have guests who don't like tea. I also like to serve a fruit platter or fruit kebabs for something refreshing.
   Here are some examples of finger sandwiches and desserts for you to serve:

 FINGER SANDWICHES:
 
   ~cucumber and cream cheese
   ~egg, tuna or chicken salad
   ~BLT on biscuits
   ~radish toasts or tartines (recipe to follow)
   ~prosciutto with fig jam on baguette
   ~shrimp salad
   ~pimiento cheese on sliced white bread
   ~caprese - mozzarella, tomato and basil on focaccia
   ~roast beef with horseradish cream on rye cocktail bread
   ~smoked salmon with cream cheese and sliced cucumber on white or brown bread


  SWEET TREATS:  

   ~pound cake with whipped cream and fresh strawberries
   ~banana bread with cinnamon cream cheese (recipe to follow)
   ~cream puffs
   ~ricotta cheese, orange marmalade on whole wheat bread
   ~lemon curd and fresh berries on english muffins
   ~chocolate hazelnut spread and seedless raspberry jam on white bread
   ~cream cheese and strawberry jelly on white bread
   ~mini scones served with a few different jams, devon custard and sweetened cream
   ~glitter doughnuts ( I will explain later)
   ~macarons


   Some things to remember when making any of these sandwiches is that they need to be small bites. A tea party lends a bit of sophistication to the day, so it's hard to be dainty while eating a full sandwich with both hands! Cut them in two-bite portions for easier handling, and always remove the crusts from the bread, unless you are using a different type of bread, such as, say, biscuits or pita. The sandwiches can also be cut into triangles, squares or any shape, if desired. All you need is a cookie cutter to make easy and pretty shapes. You should also think of using gluten free options for any of those guests who may have a sensitivity to gluten.
   When it comes to drinks, tea or coffee is a given, but why not think about a tea infused cocktail as well. It is something unexpected and your guests will be pleasantly surprised. Here is a great recipe I found on www.sugarandcloth.com for a Peach Tea Cocktail.

      1 cup brewed unsweetened peach tea
      1 ounce vodka or peach flavoured vodka
      1 ounce Mint Simple Syrup

*to make syrup, in a small pot mix 1 cup sugar, 1 cup water and bring to a simmer to dissolve the sugar. Once dissolved, add 1 cup fresh mint leaves; remove from the heat and let steep at least 25 minutes.
*add all the ingredients to a cocktail shaker or cocktail mixer glass, and serve over ice. Garnish with mint sprig and peach slice.
*any other flavour of fruit tea can be substituted for the peach tea as well


   Another fun idea to think of having at your tea party, is to set up a soda bar. Some of your guests may want to drink something other than tea/coffee. Of course, you will be serving plain or sparkling water and juices, but a soda bar can be fun and interactive. All you need are flavoured syrups and soda water. Easy peasy! Here are a few of my favourite syrup combinations:


1.  BLACKBERRY-LIME:
    *simmer 1 cup water, 3/4 cup sugar and 1 pint blackberries over medium heat until syrupy, about 15 to 20 minutes; strain and press out the solids.
    *stir in the juice of 1 lime. Let cool completely.


2. TRIPLE CITRUS:
    *simmer 1/2 cup each of orange, grapefruit and lime juice with 1 cup sugar over medium heat until syrupy, 15 to 20 minutes; strain. Let cool completely.


3. RASPBERRY VANILLA:
    *simmer 2 cups water, 1 cup sugar, 1 pint of raspberries and 2 teaspoons vanilla over medium heat until syrupy, 15 to 20 minutes. Strain, pressing the solids. Let cool completely.


   So now, let's get back to the treats! I think providing a mix of homemade and store-bought food items are always a good idea. You can take your store-bought items and make them fancier by adding just a few simple touches. For example, buying the loaf cakes (banana, lemon or pound cake) is a no brainer; then all you need to do is add whip cream and strawberries, or sweetened cream cheese spread. The same goes for your savoury tea sandwiches. Here is a very easy recipe to dress up simple banana bread:

                       8 ounces softened cream cheese
                       1/2 teaspoon cinnamon

*blend the ingredients with a hand mixer or stand mixer, until smooth
*you can either pipe or spread the mixture onto your banana bread slices
*cut the banana bread slices into rectangular slices or fun shapes by using a cookie cutter


   {pound cake with whipped cream and strawberries}

   For an easy savoury recipe, try these Radish Toasts:

                       *thinly slice a few radishes
                       *cut out rectangle slices of multigrain or rye bread, crusts removed and toasted
                       *store-bought or homemade chive cream cheese
                       *salt and pepper to taste
                       *chopped chives as garnish (optional)
 ~ spread the chive cream cheese on the toasted bread slices; top with the radish slices; sprinkle salt and pepper and chopped chives on top.

   Once the food and drinks have been decided, it's time to move on to the fun part of the party planning: decorations and table setting. China tea cups and saucers and dessert plates, are a must item you need to have at your springtime tea party. If you happen to have any heirloom pieces, now is the time to bring them out! You can also find pretty designs at thrift stores for only a few dollars. I personally like mixing up colours and styles; it gives your party a more vintage vibe, and if you have to purchase them, it makes it easier to find the amount you need.
   Use your finest table linens or do away with the tablecloth, and use crocheted doilies as a place mat to show off your fine china pieces, and maybe a simple spring themed table runner.
   If you prefer a tablecloth, look for something either floral, lace or a neutral colour. Scarves are always a favourite of mine to use as an interesting table cover, and you can find so many pretty prints and colours. One thing to remember, you don't want anything too distracting that will take away from the pretty china you are going to be using.
   For a simple take home gift for your guests, how about keeping with the theme of tea party, and give your guests a beautiful crystal creamer filled with flowers. This also does double duty as flower arrangements. All you will need is a simple arrangement for the center of the table, which I will share here as well.
   The thrift stores are my favourite place to score these beautiful creamers, and the best part is they are under a couple of dollars each! Each friend can get a different one, or if you're lucky to find more than one in the same design, even better.
 
    Tie a cute thank you tag to the handle of the creamer, and you have the prettiest party favour around! If you are having more than 6 guests, you can use the tags as place cards to avoid any confusion as to where your guests are sitting.
   A simple floral centrepiece is all you need now to complete your springtime tea party! Use your favourite flowers in pretty spring colours and a simple glass vase. I love a cluster of one type of flower, such as carnations or hydrangeas. This arrangement doesn't compete with any of the prettiness on your table, yet still makes a statement. For an extra special touch, why not add pearl beads to the bottom of the vase. You can also use pearl necklaces if you have them.

   I used a cylindrical glass vase, and added a small round of floral foam (pre-soaked in water) to sit right on top of the vase. I simply added cut stems into the foam and placed them all around it until I was happy with the arrangement. It should look full and hide the foam too.

 
   And there you have a pretty simple arrangement all dressed up for your party!

   I hope this post today inspired you to host your own tea party. Maybe for Mother's Day, or perhaps a baby/bridal shower for someone special, or even for a birthday!  Whatever the occasion, remember to make it personal so your guests feel welcomed, and remember to have fun planning it!
   Until next time!

~A


PRODUCT INFO:

*pearl beads (in vase), glass vase and floral foam from www.dollartree.com

*green grass mat from www.dollarama.com
 
*gold tags, doilies, green jadeite cake stand from www.michaels.com

*crystal creamers and mint green dessert plates from www.valuevillage.com

*tea cups and saucers, gold forks and spoons from private collection


Monday, 13 March 2017

How To Set A Dinner Table


   Hello again and welcome!  Today I am going to be sharing some tips on how to set a table two ways: formal and casual. Now you are probably thinking, "really? I know how to set a table!" And I'm sure you do, however, there are some basic rules and etiquette that you may not know, and that you may find interesting. For those times where you want to go all out and impress your guests with a formal dinner, some of these tips may become useful.
   It is inevitable that at every dinner party you must set the table. Unless, of course, you like your dinners in front of the TV. I know I do! :)
   Setting a table is not a difficult task. There is only one basic rule to remember though; utensils are always placed in the order you are to be using them, from outside in, and forks to the left, knives and spoons to the right. This goes for both casual and formal table settings.
   So now let's get to the nitty gritty of table settings.

   
FORMAL:
   
   This type of table setting is usually reserved for special occasions and holidays. Here is where you get to dress it up with your finest linens, flatware, glassware and dinnerware, to make it extra special.
   A formal setting usually requires three sets of dishes: a bread plate, a salad plate, and a dinner plate. A bread knife should be placed directly on the bread plate with the blade facing to the left.
   It is said by etiquette experts, that no more than three utensils be set at the table at a time. So what does that mean exactly?  If you are serving four courses including fish, for example, you would have a fish fork, salad fork and dinner fork. Your dessert fork would be served with the dessert on the dessert plate. By no means is this written in stone anymore, but I thought it was a fun fact to share. It may just be easier to have all your utensils you are using out on the table, so as not to forget any or to not have to scramble to find them when you need them.
   Glassware for a formal setting consists of a water goblet being placed directly above the knife and any other stemware, such as wine glasses, are to the right of that.
   Your napkin should be placed on top of a charger, if you are using one, or in the space for the plate. It can also go to the left of the forks or under them if you are lacking table space.


CASUAL:
 
   This is a much more simpler setting than the formal setting. It sets the tone for a more relaxed get-together with friends or family.
   Here is where you get to have a bit more fun too. You can add colourful napkins with napkin rings, use placemats instead of tablecloths, or even use colourful or more textural plates.
   The rules are still basically the same when it comes to glassware and flatware. Napkins can be set the same as a formal setting too, or you can have fun creating some napkin designs, such as an envelope (see pic below).
You can even find these cute paper pockets (as in pic below) to match any party theme. These are ones I used for my Friendsgiving party back in October. I found them at www.partycity.ca


   In this photo below, I used a tea towel as a napkin and added a vintage brass napkin ring to add a bit of rustic charm to my table setting.

    To create the envelope napkin fold, just follow these 3 simple steps:

      1. Fold your napkin to form a square then angle it to have points/corners facing up.

  2. Take your top and bottom points and fold them inwards and overlap them.
   
   3. Then turn the napkin so one of the points is facing up; take your bottom point and fold it inwards and up. You can also, if you prefer, tuck the envelope point inside the pocket.  
   
   And there you have a simple napkin folding technique to use at your next casual dinner party. You can also find so many other designs on line, some more difficult than others, but all really fun to try.

   Think of adding little extras to make your table settings more personal and special for your guests, and elevate your party.

MENU AND PLACE CARDS: 
             - menu cards can either be added on each place setting or in the center of the table on an                              easel so guests can easily read it. 
             - Place cards are set on each guests plate and show your guests where they are sitting; they                              are also useful if you are having 6 or more guests. It avoids the confusion of where                               guests are to be seated.

CENTREPIECES:      
             - floral arrangements in the center of your table add a special touch to your table setting,                        whether formal or casual
             - you can also do individual small arrangements at each person's place setting

FAVORS:
             - a small token for each guest to say thank you, is always welcome. It need not be                expensive, just something small such as a box of chocolates. And if using individual floral                                    arrangements, as mentioned above, those can be sent home at the end of the night with                       each guest as a party favor as well.

CHARGERS: 
             - these are oversized plates that are added under your plates to give an added touch to your                    setting. They come in all types of colours, patterns and designs, and I love using them                          for my dinner parties, no matter the occasion. You can see them in the pic below and                             the holiday pic further above in the post.
             - etiquette experts suggest that the chargers be removed when the main course is over, and                      before dessert is served. Nowadays, unless you are at a wedding or 5 star restaurant, I                             think it's okay to leave them until the end of the entire meal.

   One thing I think is important and a stress saver, is to try and set your table the night before. I know I've said it before, but it is worth repeating. It ensures that you have all the essentials needed and if you don't, if gives you time to add something or take something away.
   Another good tip is to take inventory of all your glassware, dinnerware and flatware ahead of time; say one to two weeks before your party. By doing so, you can check to see if any pieces are chipped and need to be replaced, or if you don't have enough items to use, then you can purchase those that are necessary.
   So now all you need is an excuse to throw a party! Whether it's a formal celebration, or a casual get together with friends on the weekend,  I hope some of these tips will help you feel confident enough to give it a go and set a beautiful table!

Until next time!

~A
             

PRODUCT INFO:
- paper pockets for cutlery www.partycity.ca 
-cloth tea towels www.jysk.ca and floral napkin www.homesense.ca
-milk glass vases www.valuevillage.com

Monday, 27 February 2017

Stock Your Pantry Like A Pro

<a href="https://www.bloglovin.com/blog/18489767/?claim=xxpw5exgs7u">Follow my blog with Bloglovin</a>


   Picture it. Sicily 1923... Wait, that's not right! Oh, here we go.  Picture it. You're sitting at home, in your sweats, or maybe your pj's, binge watching something on Netflix, and your phone rings. It's your family calling to say that they are about 20 minutes aways and they are going to drop by. Or better yet, they just show up without warning! Yay! What do you do?
   Hopefully you have your pantry stocked with snacks that you can put out to serve your unexpected guests, or better yet, items to create a decent meal!  Because chances are, they will be peckish. Well if not, I got you covered!
   Today's post is all about pantry staples that are a good choice to have on hand at all times, and some of these items are my faves. Even having just a few of these will make sure you are party ready at any moment! I'll also be sharing an easy recipe that can be whipped up in no time.
   So get your pencil and paper ready, (or phone) and start making your grocery list!


    NUTS: roasted almonds or cashews (unsalted/salted), or mixed nuts

    HONEY: use it in salad dressings, or on a cheese board

    CORNICHONS/GHERKINS: these mini, tart pickles are great with sandwiches or with cheese                                                             and cured meats. Dill pickles will also work if you are not a                                                                   fan of gherkins.

    TUNA: good quality tuna in oil is great in pasta dishes; in a pinch, mix it with diced red onions,                      chopped fresh parsley, some black pepper and a bit of olive oil; serve with crackers or                          fresh crusty bread.

    OLIVES: kalamata, green, or cocktail olives are always a hit.

    MARINATED VEGGIES: artichokes, giardiniera, or sun-dried tomatoes are great additions to                                                       sandwiches, cured meats and cheese. Add sun-dried tomatoes to                                                             hummus, whipped feta or goat cheese and serve with crackers.

    DRIED PASTA: you can make a quick, easy and delicious meal in about half an hour. A simple                                      recipe to try is Pasta Aglio e Olio. ( find the recipe at the bottom of this list)

    SAN MARZANO TOMATOES: they are sweeter and firmer than other canned plum tomatoes                                                                 and lower in acid; use them in sauces, soups and on pizza.
                                                           
    DRIED FRUITS: apricots, figs, cranberries, go well with cheeses; but even better are mangoes,                                        papaya or pineapple. Delicious as a snack all on their own.

    DIJON MUSTARD: great in dressings, a spread for sandwiches or add it to a marinade for                                                     chicken

    CHOCOLATE COVERED ALMONDS: because you always need a sweet, fancier treat!

    CRACKERS: this is a given. Any type of cracker is acceptable; breadsticks are a good choice too.

    GOOD QUALITY CHIPS: I like Terra veggie chips. They are great served with dips like                                                                hummus, onion dip and baba ganoush. Pretzels are a great snack too;                                                    either on their own or with dips and mustards.

And like I promised, here is the pasta recipe:

                      Pasta Algio e Olio

1 pound pasta (preferably spaghetti)
1/3 cup olive oil 
6-8 cloves garlic, finely sliced
1/2 teaspoon red chilli flakes
1/2 cup minced fresh parsley
1 cup freshly grated Parmesan
salt and pepper to taste

*cook pasta according to pasta directions in salted water
*meanwhile, heat oil over medium heat in a large skillet; add garlic and when oil begins gets hot, reduce heat to medium-low; cook garlic until it its golden brown (5 minutes). Stir in chilli flakes and salt and pepper. Remove from heat.
*add drained pasta to skillet; sprinkle in the parsley and half of the cheese; stir until combined.
*sprinkle with the remaining cheese when ready to serve
   -tuna would be a great addition here as well


   Now you have a few ideas of what to stock in your pantry so you are always ready at a moments notice. With even just a few of these items in your pantry repertoire, you can rest easy and indulge your guests with a great meal on the fly!
   The only problem with that is, they may be so impressed with your culinary abilities, that they may stop by more often! :) 
   Until next time!

~A


TIP: Whenever you make your next grocery trip, be sure to replenish any pantry items that may have been used up, so you are not without the next time company drops in. Most of these items are fairly inexpensive, so you can always buy a few at a time too. 

Tuesday, 14 February 2017

Cheeseboard 101

 
   Hi there everyone! Today on the blog I am going to share some great tips for setting up a cheeseboard and cheese table for your next party or get-together.
   Nobody loves cheese more than I do. Okay, fine, I'm sure there are lots of you out there who love cheese just as much as I do, and a great cheeseboard is something your guests will gravitate towards for sure. 
   With some easy tips and how-to's, you can create a beautiful display that will have your guests wanting more!
   First things first, when shopping for your cheese items, always think about serving cheeses with a variety of textures and flavours, and serve at least one familiar cheese.
   There are four categories of cheese:

                                  AGED - such as cheddar or comte
                                  FIRM - such as Parmesan or Manchego
                                  SOFT - such as brie, camembert or chevre
                                  BLUE - such as stilton or gorgonzola

   Serving one type from each group is a good place to start when creating your cheeseboard, but no more than that. You don't want it to be overwhelming! You will need to serve 2 - 4 ounces of cheese per person; that's considering the fact that you will be serving other things with the cheese, which we will get to later on.
   So, for a party of 12 guests, you should have at least 24 ounces of cheese served at your party. If cheese is the star of the party and the only thing you will be serving, then plan on buying 3 pounds for 8 people, 6 pounds for 16 people, and 9 pounds for 24 people.
   Keep things simple by serving cheeses in wedges or big chunks, and always serve cheeses at room temperature; all except soft cheeses. Take them out of the fridge at least one hour before serving. This will ensure the flavours of the cheeses shine through!
   A good tip is to separate the strong smelling or pungent cheeses from the others, so as not to have competing flavours. Just place them in smaller dishes or platters, and have them at opposite ends of the table.
   Also think about labelling your cheeses; this way you won't have to keep reciting it to each guest who asks. Why not take it a step further and describe the cheeses in a few words on a piece of paper or place card and place it next to the cheese type. Here are some examples:

                                   PARMESAN - nutty, sharp and savoury
                                   CHEDDAR - creamy and sharp
                                   GORGONZOLA - nutty aroma, sharp
 
   This little extra bit, helps your guests understand what they are tasting, and might make the ones who strictly eat cheddar, a little bit more adventurous!
 
ACCOMPANIMENTS

   I am going to give you some ideas now for accompaniments that can give your cheeseboard or table visual interest and delicious side options! Many of these accompaniments complement the flavours of the cheeses as well, making the tasting experience that much more appealing.
   Offer a selection of breads, breadsticks, and crackers (such as melba toasts, water crackers and crackers with dried fruit or nuts). Jams, jellies, compotes and chutneys are perfect with cheese and crackers. I have a delicious recipe that I am going to share with you today. It's an easy recipe to remember and it works well with a variety of cheese types that you may be serving at your party.

                             FRUIT AND ONION COMPOTE

                    1 apple, peeled, cored and finely chopped
                    1 pear, peeled, cored and finely chopped
                    1/4 cup finely chopped onion
                    1/4 cup apple cider or apple juice
                    1/4 cup marmalade
                    1/4 cup packed brown sugar
                    1/4 cup apple cider vinegar
                    1/2 teaspoon EACH salt and nutmeg
                    Pinch of ground cloves

-In a small saucepan, combine all the ingredients and bring them to a boil; stirring often. Reduce heat and simmer, uncovered, and stirring frequently, until thickened; about 25 - 30 minutes. Let it cool before serving.
-If you happen to have any left over, it can last in the refrigerator for up to 2 weeks in an airtight container.


   Some other ideas for accompaniments would be to have a selection of cured meats, such as salami, prosciutto, and Serrano ham.
   Dried fruit such as figs, apricots, cherries and cranberries always go well with cheeses and enhance the flavour, as does, fresh fruit such as pears, apples and grapes.
   Think about serving nuts on your cheese board or table as well. Smoked or roasted almonds, halved walnuts or pecans, and Marcona almonds are good and familiar options.
   Jarred pickles/cornichons, roasted peppers, marinated artichokes/eggplants and olives are all delicious served with cheeses. I have a recipe for marinated olives that I have made before, which is really easy and tasty. Of course you can always buy marinated olives at the store, but I bet if you try this recipe, you'll be making them all the time.


                               MARINATED OLIVES

                      3 cups of mixed black and green olives
         ** if olives are in a brine, drain them and discard the brine**
                      crushed chilli flakes, to taste
                      2 cloves garlic, sliced thin
                      1 cup olive oil
                      1 sprig fresh rosemary, chopped
                      zest of half lemon or orange ( I like a combination of both) - you can also use larger                                strips of the zest instead
                      kosher salt, to taste


SERVE WARE & SET-UP

   Think about what you are going to serve your cheeses and accompaniments on, and do this in advance of the party. A variety of bowls in different sizes and shapes can hold items like olives, marinated vegetables and nuts. And remember to spread out platters around the room, if space allows. Or, if using a dining table, think about taking all the chairs away from it, so your guests can reach their food from both sides. This way there isn't a traffic jam or line up, and it also keeps guests mingling.
   Baskets, platters and trays can hold your crackers and breads. Breadsticks can be displayed in mason jars, pitchers or plain glasses.
   If you can find them, slate or chalkboard platters make displaying your cheeses easy and appealing. You can even find chalkboard paper runners to display on your table. You can write the names of the cheese right on the board or paper itself, and not have to worry about cheese tags/labels.
   Marble and wooden boards or platters are also good surfaces for cheeses. It may be a good idea, if using marble, to place a piece of wax paper under the cheeses, so they don't leave stains on your marble!
   Cheese knives and spreaders are a smart idea to have to help your guests serve themselves. Each cheese should have their own, this way you won't be tempted to mix the brie with the parmesan!
   Don't forget to have small appetizer plates at the ready, as well as, napkins, cocktail picks or cocktail forks, and small dipping bowls for olive pits. [The black cheese knives above are from www.loblaws.ca,; wooden cheese markers are from www.homesense.ca; gold cheese knives are from www.chaptersindigo.ca]

   Depending on whether you are doing a cheese board or cheese table, adding visual interest is key. If you are only serving a cheese board, make sure it is large enough to hold at least 2 - 3 cheese types, as well as a few accompaniments. You can serve everything loose on the board or choose to serve some things on small plates or in small bowls for easy access.
   If you plan on doing a cheese table, then adding serving pieces in different heights and levels are a good way to add visual interest. It also helps your guests to see all the items you are serving, as well as, making it easier for them to reach said items.
   Use items you have around your home, such as boxes or crates, cake stands and books stacked in a pile. For an easy do-it-yourself cake stand, take a cup or glass turned upside down (a candlestick holder also works well) and add a plate on top.
   Once you are happy with your layout and display, fill in any empty spaces with candles and flowers. Fresh herbs in vases, planters or glasses, look really beautiful and are a more affordable option to flowers.
   It is no secret that wine and cheese go hand in hand, so it's only fitting that wine should be served along side your cheese board. You, of course, can serve other drinks or cocktails to give guests options. Champagne, from dry (brut) to sweet to extra dry (demi-sec), pairs very well with all cheeses too. For 12 guests you should look at getting at least 8 bottles of wine if this is the only drink you will be serving, and if serving champagne as well, a couple of bottles should suffice.
   Here is a breakdown of a few examples of what wines go with what cheeses.


             CHARDONNAY/SAUVIGNON BLANC - Brie, Blue, Chevre, Gruyere
             CHAMPAGNE - Chevre, Gouda, Brie
             PINOT NOIR - Cheddar, Chevre
             ROBUST REDS -Parmesan, Blue, Manchego
             DESSERT WINES - Blue
             REISLING - Gruyere, Chevre, Gouda,
             ROSE - Cheddar

   Now, by no means is this a written rule for your party, but merely a suggestion and guideline of options to give your guests. In my personal opinion, wine, no matter what type, goes with everything! :)
   I really hope that you walk away with some great tips and ideas to have your own cheese party, and if all else fails, why not open a bottle of wine, and have a cheese party for 1!
   Until next time!

~A


PRODUCT INFO:

-wood cheese table www.potterybarn.com
-gold leaf cheese knives, green and white appetizer plates, black bowl www.chaptersindigo.ca 
-metal oval dish www.crateandbarrel.com
-metal cake stand www.michaels.com
-wood bread board www.urbanbarn.com