Wednesday, 7 July 2021

Summer Table and Bar


            Happy Summer!!!


            I am not the type of person who likes spending time outdoors, like at all; especially if its hot and humid! However, I do love creating simple and beautiful spaces outdoors that perhaps, will invite me to sit awhile. So, today, I am sharing a simple, cozy and inviting tablescape, along with a fun bar cart set up that will hopefully bring me outside to enjoy the summer season. Maybe for an hour or two :)

            I used items that I already had on hand and most are either from the dollar store or local thrift stores, so this can easily be created in your outdoor space too very affordably. 


            I started off with a simple natural sea grass table runner and added some woven place mats for some added texture. I think they are the perfect summer base for the casual, relaxed vibe I was going for. And the place mats are easily washable, so no need to worry about spills!

            I then added simple white melamine plates, white handled cutlery and white linen napkins with thrifted rattan napkin rings to complete the look of the place setting, along with my favourite summer glasses from www.pier1.com .  I love using melamine dishes when dining outdoors. It's practical and can still look chic if you buy good ones. Also, I am not so worried about them breaking or getting damaged!      

            Next, for a simple centrepiece idea, I simply used these potted faux plants I had around my house! I love the aged terracotta look, and you could easily use herbs or real flowering plants instead of the faux ones, but I created this table setting on the fly, so I was okay with it.

    
                                                                                                                                                                                      I always like to add a little something extra to my place settings if I can, and when I found these resin/clay starfish at www.dollartree.com, I knew they would be perfect! If you are having guests over, they make they cutest summer party favor. You could even add a name tag to them to act as a place card. 
          
              Also while at the Dollar Tree, I happened upon these adorable fruit shaped trinket dishes which are for holding jewelry, but added to my summer table, they are just too cute. They can also be a cute favor for guests to take home with them, or use it as a butter pad, or add some sliced limes and lemons for your drinks! They will also make pretty tealight candle holders which you can place down the middle of your table! The possibilities are endless!


              Now that the table setting was done, it was time to move onto a the bar cart. We have had this white cart/trolley from www.ikea.com for a while now and never really put it to good use. So I thought, why not have some fun and set it up as an accessible bar area for me and my guests! 

               I gave it a good cleaning and then started to have fun styling it up! I used a couple sea grass place mats to put on the shelves to display the bar items, then kept it simple with bottled water, a bowl of fresh lemons and limes, a cocktail pitcher and all the essential bar tools needed to make the perfect summer cocktail!


                Some stylish bar glasses, straws, and stir sticks, along with this adorable cocktail sign, finish off the look. It's also a good idea to have a tea towel or bar towel handy too for spills. I hung a white flour sack towel here on the handle of the cart for easy access. Now, there is no reason why you and your guests can't help themselves to some refreshments and there is no going in and out of the house either, which makes it easier to relax and enjoy the company!


                 So there you have it! An easy, casual, yet elegant table scape that will take no time at all to recreate and it doesn't cost a fortune to do! All that's left is to start up the barbecue!


                  I hope you take away some ideas from this post and that it encourages you to get outside and enjoy the summer season! 

 Until next time!

A~


PRODUCT INFORMATION:

- placemats and runner from www.homesense.ca

- napkins and white melamine plates from www.realcanadiansuperstore.ca

-fruit shaped trinket dishes, white cutlery, and resin starfish from www.dollartree.com

-rattan basket weave napkin rings from www.valuevillage.ca

-rattan and green glass tumblers from www.pier1.com

-terracotta pots and faux greenery from www.michaels.com

-melamine snack bowls (on table) from www.chapters.indigo.ca

BAR CART

-gold bar glasses from www.crateandbarrel.ca

-flour sack towel from www.walmart.ca

-glass cocktail pitcher from www.chapters.indigo.ca

-bar tools such as zester and peeler from www.dollarama.com

-white bar cart/trolley from www.ikea.com


Wednesday, 25 November 2020

CHRISTMAS PLACE CARDS ~DIY~


   I cannot believe we are fast approaching the holiday season already! It will most likely look very different than other holidays, what with the pandemic and all, but it doesn't mean it still can't be as special as previous Christmases.

   On this post today, I will share some simple and festive diy place cards for your Christmas table! These ideas can be used in all seasons really, with just a few subtle changes. I will also share a simple tablescape centrepiece idea that can be done using items from your local dollar store, or maybe your own home collection. 

   The first diy I am sharing is this adorable twig place card. It couldn't be any simpler to make these; I took some sticks and cut them to the size I needed with my hand saw, hot glued them at the ends to keep them together, and added a little name card and some greenery. That's it! So simple yet so pretty! Another take on these is to use cinnamon sticks instead of the twigs for an even more of a festive feel. 


   The cost of this diy was free for me because I found the sticks on a walk in our neighbourhood, and the cards for the names I already had on hand. TIP: it is a good idea to buy plain name cards in bulk or whenever you see them, so you always have some on hand for any project. The ones I am using in the picture are actually blank business cards from www.staples.ca. They are simple and the perfect cream colour, and I have used them on many occasions. They also came in a pack of 100, so I won't be running out anytime soon!

   Place card diy number 2 is just as simple as the one above; these mini tree rounds are super cute and super easy to make as well! I found these mini wood slices at my local dollar store, but any craft store  would have them too, as well as online. I used these mini bottle brush trees to add an embellishment to the wood slices, which I found on line at www.amazon.ca. I simply hot glued the tree to the round and left some space at the bottom to add my guests' name. I used stickers for the names instead of a marker or pen, just because it gives me the option to use them again at some point. 


   If you wish, you can either use a sharpie marker or chalk marker to write the name of your guests on the wood slice, especially if you have calligraphy skills. Even a wood burning pen would be another idea. If you chose any of these variations, the wood round would make a cute party favour for your guests to take home to remember the evening ~ granted you are allowed to have guests :)!

   The last diy is so pretty and probably my favourite one - Rosemary Wreaths! All you need for this, is fresh rosemary sprigs from the grocery store, some twine or string, and a small tag. Try to find really long sprigs of rosemary, as this will help make the wreaths a little bit bigger and easier to tie in a cirlcle.  All I did was simply take the sprig and conform it into a circle shape; tied the two ends together with some floral wire and then added a twine bow at the top! A simple wood tag with your guests's name and it is the cutest little place card. The wreath can also be used as a napkin ring too. 


   All of these diy place cards take no time to make and make a lasting impression! You could take it a step further and make it a family craft night and have everyone join in on the fun!

   Now for the centrepiece idea! It is so simple yet makes such a beautiful statement! I have a bottle brush tree addiction so I thought what better way to display them then to have them act as my centrepiece for our holiday table! It takes no time to do and you can find so many of these trees nowadays pretty much everywhere! Most of these are from my local dollar store www.dollarama.com, but they are sold on Amazon, Home Depot, Michaels and so many other stores, all at different price points, sixes, heights and colours. I try to collect some every Christmas season because you can never have too many bottle brush trees, right?


   On either side of the bottle brush tree centrepiece, I have these beautiful faux wreaths I picked up at a local small shop near me called www.bellafleurboutique.ca. I got them last year and I use them all the time. I added some black metal candle holders from www.amazon.com to complete the look.

   I kept the place settings very simple by adding a gold charger, black dinner plates and my favourite white and gold salad plates. A simple linen cream coloured napkin and brass napkin holder complete the look! I added some gold cutlery too; and these are a new recent purchase that I am so happy I made! These are from www.miniso.com and were so affordable! A blanket scarf runner in a cozy, fuzzy texture is perfect for the holidays. I love using blankets and blanket scarves as table cloths because you can find them all the time and in so many amazing colours and patterns! This particular one is from www.dollarama.com.                    The finishing touches were to add these pretty brass metal tumblers that I also purchased from the dollar store, and I these gorgeous crystal champagne coupes that I stole from my mom. Don't worry she knows :)  

   I also added some small appetizer plates in the center of the table in case guests (or us) wanted to nibble on some snacks before dinner. These adorable plates are from www.michaels.com and I have had them for a few years now and I just love them! 


   You can still add tons of impact and visual interest with some easy table setting ideas and simple diy projects without breaking the bank! All you have to do is look around for inspiration and shop your home; and if you have limited supplies on hand, then your local thrift and dollar stores will always surprise you! I always find some treasure I never knew I needed. 


   I hope you try some or all of these simple diy place cards for your next dinner, or maybe you will take inspiration from this post and try something completely different! Whatever you do, make sure you have fun and let your creative spark fly!

   Until next time!

   ~A


PRODUCT INFORMATION:

-bottle brush trees (in center of table), blanket scarf, brass metal tumblers www.dollarama.com

-black dinner plates www.ikea.com

-gold cutlery www.miniso.com

-white and gold side plates www.realcanadiansuperstore.com

-gold charger plates, small appetizer plates (in center of table) www.michaels.com

-mini bottle brush trees www.amazon.ca

-silver footed bowl (with chocolates) www.valuevillage.com

-faux green wreaths www.bellafleurboutique.ca

-black metal candle holders (in wreaths) www.amazon.com


**linen napkins, napkin holders were Facebook Marketplace finds


Friday, 16 October 2020

CREEPY CHIC HALLOWEEN TABLE SCAPE


   I love Halloween! The creepier the better! When I think of Halloween, I somehow always think of the Old Victorian era. Regal ladies wearing the latest corseted and billowing dresses, ghost stories of yore and cobweb laden Victorian mansions swarming with spirits of those who lived there long ago. 

   Halloween this year, as with many holidays that have passed, will be slightly different. Will there be any trick or treating and costume parades? Probably not! However, that is not going to stop me and my family from enjoying it in the best way we can. So I came up with this creepy chic (yes I have claimed these words to be a thing), Halloween tablescape! Whether you are able to have a few close bubble friends/family over, or if it is just with your immediate family, try to celebrate Halloween with a little bit of fun! 

   I am going to share my tips on how to decorate your table with some fun and inexpensive Halloween items that you can find at thrift stores and dollar stores. You may already have some of these items or similar ones that you can incorporate into creating a spooky table setting for a creepy chic Halloween!

  Let's get started! I had these cobweb and lace runners and material already that I purchased at the dollar store. You can find them either at www.dollartree.com or at www.dollarama.com. I love the old creepy vibe they give to the table. I used one in the center of the table and two others for underneath the place settings, instead of using placemats or a tablecloth. 


   I had these silver chargers already on hand and purchased them at www.realcanadiansuperstore.ca. They are so pretty and have that Victorian vintage style that goes perfect here. I then added a simple black dinner plate from www.ikea.com. Silver cutlery with vintage details and glass champagne coupes add the final touch to the place setting. I added a small picture frame that can add as a place card for your guests or family, or you can add a creepy picture inside it as well. 


   For the centrepiece, I had this vintage silver tray I found at my favourite thrift store and made some of these stacked books to add some height and dimension to the centrepiece. I then added some plastic skulls from the dollar store and a few black faux roses, along with a velvet pumpkin I found at www.dollartree.com.


 To make the books, all you need are thrifted books (I prefer the hardcover ones), paint them with black acrylic paint and add some stamped spooky words or phrases with white ink. I also sometimes sand down the spines of the books so the engraved letters don't show through the paint. Then add some gauze or kitchen twine and a plastic bone for that added spooky touch!

   I had this amazing silver candelabra that we had gotten from a wedding and I love it so much! I use it every Halloween and it is the perfect touch! I placed a plastic skull in the middle of it and two black taper candles. 


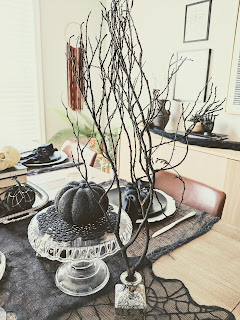
   At the other end of the table for some more visual interest, I found these branches in the trail in front of our house and spray painted them black. I used a small silver jar from www.dollartree.com to hold the branches and I just created another easy centrepiece idea! Beside it I placed a glass thrifted cake stand from www.valuevillage.com, topped it with a crocheted black doily and a glittered black pumpkin from the dollar store.


   I also decorated my sideboard behind the dining table with just a few Halloween decorations such as my Palmistry sign and hand (which are my favourite pieces this year) from www.dollarama.com, and a thrifted silver plate and glass cloche with a plastic skull inside. I draped a black cobweb cloth along the sideboard too.


   There you have it! A creepy chic Halloween tablescape that will ensure your party is fun, exciting and just a little creepy, however you are planning to celebrate this year! Look around your home and in your decoration bins (because we all have those right?) and see what you find to create a ghoulish Halloween tablescape. You never know what unexpected treasures you will find!


Until next time! ~A


PRODUCT INFORMATION:

-silver chargers from www.realcanadiansuperstore.ca
-plastic skulls, cobweb cloth, lace runner, black taper candles, black faux roses, styrofoam crows, from www.dollarama.com
-black cobweb cloth, velvet and glitter pumpkins, silver bottle used as a vase from www.dollartree.com
-clear glass cake stand, silver tray with glass cloche from www.valuevillage.com
-black dinner plates from www.ikea.com
-black doily (on cake stand), and place card picture frames from www.michaels.com
-silver cutlery from my wedding, glass champagne coupes handed down to me by my mom, black napkins (unsure of where they were purchased), and silver candelabra from a wedding. 

Tuesday, 6 October 2020

FALL TABLESCAPE


Sweater weather is upon us and I for one couldn't be more excited! The leaves on the trees are changing hues. The scents of the season are wafting through the stores and coffee shops. And I have fall tablescapes on the brain! 

Today, I am going to show you an easy and inexpensive way to dress up your table for fall entertaining. Whether it is a table set for two, or one for your bubble family, you can use these ideas anywhere, anytime.

Entertaining these days does look quite different than it did last year. No more large events or gatherings; no more getting together with the usual group of friends unless at a distance. Whatever the situation, you can still set up a beautiful table for any special occasion you are celebrating!

The ideas here today are ones you can use throughout the year just by changing up the colours, textures and themes to relate to the season.


   I created this easy and inexpensive fall table setting with items I had around my house and have collected over the years. A lot of the items you see are from my local dollar store, so I didn't have to spend a ton of money, but still made it look like I did.

   To start, I laid this textured soft faux fur throw in the center of the table instead of a traditional runner, and I love the unexpected touch it gives to the table. This blanket is from www.dollarama.com and was a mere $4! 

I then added this faux fall garland from www.michaels.com in the center of the blanket and added some brass thrifted candlesticks I already had, as well some small amber glass bottles, which I also got at Michaels for under $2 each. I added some faux wheat branches to the bottles for an extra fall touch! 


   I found some really cute glass vases at www.dollartree.com for $1.25 and they have such beautiful shimmering colours that really elevated the table and the centrepiece. 


   For the actual table setting, I used these faux wood chargers from Michaels underneath these stoneware plates in cream and brown that were a free find on a sale site I frequent often. The colours work so well together I think. I also added these mustard coloured soup bowls that I have had for years now from www.ikea.com, and am so glad I held onto them because they are the perfect accompaniment to any fall table. (unfortunately they are no longer in stock) A mini copper pumpkin from the dollar store adds a special touch, which can either serve as a party favor for guests, or as a place card with your guest's name. 


   Some simple brown cotton napkins with wood napkin rings add a warm touch, as well as thrifted vintage cutlery, which I have had for a while. 

   I also found these adorable gold metal cups from our local dollar store and knew they would fit well on this tablescape. Some clear glass champagne glasses with an amber stem, fill in for the typical wine glass. These beautiful glasses were also a freebie!


   That is really all there is to creating a simple fall or seasonal tablescape! Look around your home and get creative. Glasses can fill in for vases, tumblers can fill in for wine or spirit glasses. Using what you have and what makes you happy, is all that matters. You will be surprised at what you can create when you think outside the box. 

   These ideas can be easily changed up to suit any season. Lighter coloured napkins, such as cream or white, can be used for a spring or summer table setting. Using a light blanket scarf, linen or cotton table runner or cloth would also suit a spring/summer table nicely, as well as fresh bright florals.

   And if you are looking to entertain in the colder winter months, then a simple silver and white palette or the classic red can bring that look for you. 

   I hope you find some inspiration in this post, and think about what you may have around you home that can create a beautiful table setting for your family and loved ones to enjoy! 

   Stay safe and enjoy this time together!

   Until next time ~A


PRODUCT INFORMATION:

-blanket, copper pumpkins, gold tumblers=www.dollarama.com

-brass candlesticks, bone cutlery=

-glass shimmer vases=www.dollartree.com

-amber glass bottles, faux wood chargers, faux pumpkin garland=www.michaels.com

-cream stoneware plates, champagne glasses=FREE

-mustard coloured soup bowls=www.ikea.com (no longer in stock)


Monday, 1 June 2020

Picnic Lunch


     2020 has become quite the interesting year! I hope that you are all staying safe and healthy, and managing all the day to day activities without going absolutely stir crazy. One thing I am not taking for granted is the extra cuddles and family closeness we get by being quarantined together. I'm not saying it is always easy, but it we try to make everyday as special as we can.

     One way to keep our family entertained is by creating special moments and doing everyday things in different ways. Now, I definitely am guilty of having our dinners in front of the television or having my daughter eat in her playroom instead of with us, but there are days when those are warranted, and I will not judge anyone who feels the same way, nor will I apologize for it!

    But some days turn out better than others, and this was one of them! I created a little family picnic for lunch instead of being indoors. The days have finally been getting warmer, so outside time and a little Vitamin D is called for.

    It doesn't take much to create this little picnic and fun was had by all! I took this small collapsible picnic table that I have had for years now and has gotten a lot of use when we would go camping or to a park. It is from www.crateandbarrel.com, and it is probably the best if not the coolest little table!
It assembles easily and is made of wood to boot! It is also a great table for the kids to play on while being outdoors; they are the perfect size!

    I tried to make the area as comfortable as possible by throwing some outdoor cushions for us to sit on! These fun cushions are from www.jysk.ca, and were bought two summers ago. I draped the table with a simple linen tablecloth, but you could easily leave it bare or use placemats if you wanted.  I added these cute wicker chargers for under the plates to give it a more fancy yet homey feel. These were a great thrift store find. I find these all the time when shopping at the thrift stores (which I hope start to open back up soon, because I miss thrifting ), and they are always inexpensive.

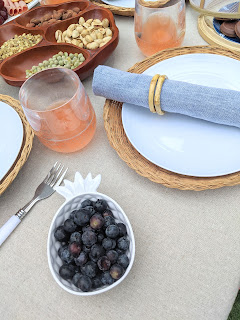
    I had these cute blue tea towels in different patterns and thought they would make great napkins. I simply added two bamboo napkin rings to dress them up a bit. For the dinnerware, I decided to use melamine because it just works best for us when we dine outside. I have simple white dishes and cutlery, which I bought at the dollar store. I like the white because they go with everything, and you can add any colour of accessories or decor to amp them up! Scour your dollar stores, especially now that summer is approaching; you will be surprised at the items you can find at great prices and quality.

    The glasses here are plastic as well and are the perfect vessel to hold a fruity summer drink! They are from www.realcanadiansuperstore.ca. I dressed up the middle of the table with an outdoor lantern, and a faux arrangement that I made all with supplies from, you guessed it, the dollar store. www.dollarama.com.

    Seeing as this was just lunch, I kept the menu simple. Now that is not to say you can't eat like this for dinner too, actually I highly recommend it! I served a tray of a simple charcuterie that I know my daughter would enjoy too. I had some deli ham, cheese slices, crackers and grapes, as well as, a bowl filled with some salty snacks: roasted almonds, roasted lentils and peas and some pistachios. These cute little pineapple bowls held some raspberries and blueberries. The bowls are from www.walmart.ca and are melamine too. A perfect summer table accessory.

    For a sweet snack, I had these s'more cookies displayed in this adorable little rattan plate with a cover. It is the cutest little serving tray and the cover helps keeps the bugs away too. I found it at www.homesense.ca, where they have so many beautiful outdoor accessories at such great prices!

   All these items I used for out family picnic came from my home. These are items I have had for a while or bought pre-Covid. You really don't need to go out and spend a lot of money in order to do a similar set up as mine. Use what you have and get creative! That is the fun part!

   I do hope you walk away with some neat ideas and tips you can use for your own little family picnic and above all,  just have fun and enjoy a relaxing moment spent with the ones you love!

Until next time!
~A


PRODUCT INFORMATION:

- wicker placemats and wood bowl from www.valuevillage.com
- melamine plates from www.dollarama.com
- plastic glasses from www.realcanadiansuperstore.ca
- pineapple bowls from www.walmart.ca
- beige linen tablecloth from www.michaels.com
- small rattan serving plate with cover from www.homesense.ca
- napkin tea towels and outdoor pillows from www.jysk.ca

Adventure Birthday Party


     For my daughter's 6th birthday party this year, I wanted to do something different! So we came up with the idea of an outdoor adventure party.
    We had originally booked a park and were hoping to have the party there, however, with my daughter's birthday being in November, the weather is always tricky. It wasn't on our side!
    We ended up having it at home, but it turned out great and the kids had fun, which in the end is all that matters!
 

     To keep the kids entertained, we had a Scavenger Hunt prepared! Luckily for us, in our area we have a trail right across the street from our house. The kids had their lists ready to go, and seemed very eager to check off all the items on their list!


    Found this cute printable from www.momdot.com. I attached the printable to craft paper bags and added a crayon inside so it was easy for the kids to hold their collectibles and check the items off their lists!
     After they all got back from their activities, it was time to eat! We offered a simple meal of hot dogs and sides. Instead of serving french fries, there were corn chips and goldfish crackers. We also served pepperoni sticks ( which were a huge hit) and veggies! 

     Instead of paper plates, I found these cute pie pans from www.dollartree.com. It was a bit of a splurge, but we can use them for so many other parties or even for when we go camping! And they really fit the part too!

    I already had these cute enamel mugs and thought they were the perfect vessel for holding the bamboo cutlery and napkins. I found the cutlery here: www.amazon.ca
    For a fun alternative to a candy bar, I created this Trail Mix Bar. It was a big hit with the kids and the adults! You can really add whatever you like to your bar; you can go all out or keep it simple. For this one, I had mini marshmallows, pretzels, raisins, a mixture of dark chocolate, caramel and milk chocolate chips, and some delicious graham cracker cereal. 
    I included some small craft paper bags so everyone could eat them on the go or take them home with them. I also created this DIY stand to hold the bags. It was very easy to do. I took two small wood crates that I found at the dollar store, and I stained them. I found some mini dowels and simply hot glued them at each corner of the crates and attached it all together. So easy and so cute and I can use it for future parties and displays too!  

     This trail mix sign was found on www.catchmyparty.com as well as the other labels used throughout the party. I just added it to a simple black frame found at the dollar store. The DIY stand is at the back. 
     I found these metal bowls at the dollar store too to hold all the trail mix fixings and added some clear scoops. 


      A successful and fun party doesn't have to empty your bank account. With careful planning and sourcing, you can throw an entertaining and fun party just using your imagination and supplies you find at your favourite stores. 
     My daughter and her friends, as well as our guests, all had a great time! 
     I hope this post gives you some great ideas to use at your next party and inspires you to have fun in the planning process too!